Created March 23 2003� Irishshine7's Creations.
I saw a craft show on tv, where they made this cute
canister using claypots. I loved the finished result and thought I could
duplicate it using psp. This is my version. Hope you enjoy it. This is my
1st attempt at writing a tutorial, so be patient with me.
Tools you will need:
1. Jascs paintshoppro This is a free 30 day trial.HERE I am using version 7.
2. EyeCandy 4000. HERE (I am
using Shadowlab)
3. My FlowerPot Canister Selections .Here
Unzip and put into your selections folder. If you dont have one, make one
now.
4. Stencils, Sweet and Kool has some beautiful stencils. Get them
Here.
I am using the apple stencil. Select the one you want and put into your psp
folder. Open in psp and minimize for now.
Okay have all of your supplies? Lets get
started.
1. Open 600 x 600 new image. Transparent, 16.7 million colors.
2. Add new layer, name it Bottom
3. Selections, load from disk, open your bottom.sel
4. Floodfill with your choice of color, I am using floralwhite, #FFFAF0
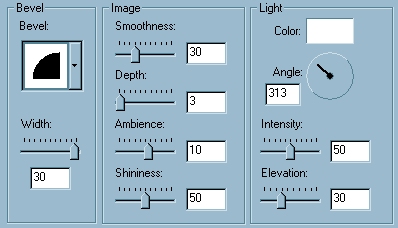
5. Deselect. Go to Effects, 3-D Effects, Inner Bevel and apply these
settings.
6. EyeCandy Shadowlab, apply a shadow using these settings.
A. Direction/270
B. Distance/2.00
C. Opacity/63
D. Blur/0
E. Perspective Blur/0
F. Color/black
G. Draw outside selection only/Checked.
7. Add new layer, name this one Rim.
8. Selections, load from disk, open your rim.sel
9. Floodfill with your choice of color, I am using a darkred, #8B0000
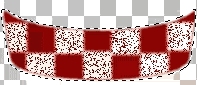
10. Leave selected, Add new layer, name it Checks.
11. Click on your paintbrush, using these settings:
A. Square
B. Size/65
C. Hardness/75
D. Opacity/100
E. Step/25
F. Denisty/75
using your bottom color that you chose. Create a gingham pattern on
your rim.
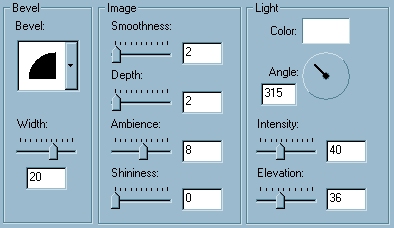
12. With image still selected and on the checks layer, Go to effects, 3-d
effects, inner bevel. Using same settings as above.
13. Deselect. Hide your other layers leaving visible the rim layer and
checks layer. Layers, Merge Visible. Apply Eyecandy Shadowlab, using same settings as
above. Unhide your layers.
14. Add new layer, name this Toprim.
15. Selections, load from disk, open your toprim.sel
16. Selections, modify, expand by 3.
17. Floodfill with color you chose for the rim.
18. Selections, invert, apply same inner bevel as used.
19. Deselect. Apply EyeCandy Shadowlab, using same settings as above.
20. Add new layer, name Top.
21. Selections, load from disk, open your top.sel
22. Floodfill with color you chose for bottom.
23. While still selected, Apply inner bevel twice, using these settings:
24. Deselect. Apply EyeCandy Shadowlab, using same settings as above.
25. Activate your bottom layer. Selections, Select all, Float. Open your
stencil that you chose, Copy and Paste as new layer. Using your Mover
tool, Place stencil in center of pot bottom, you may have to resize, going
to Image, resize, make sure you have resize all layers and maintain
aspect boxes unchecked. Resize to your liking depending on stencil you
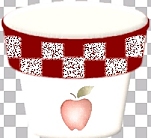
chose. For the apple I used 50%.
26. This is what your image should look like now.
27. In your Layers pallet, activate your top layer, Selections, Select all,
Float. (If you dont want to add a stencil to the top you may skip this and
go on to 27.) Repeat 24 for placing your choice of stencil on the top
layer. I used a vine stencil. Resizing it to fit
28. At this point you can merge all layers, excluding Layer 1, hide that.
29. Now we are going to add the final touches.
30. Activate the layer you just merged, Add new layer.
31. Click on your preset shapes tool
32. Choose the Red Sphere Shape, Clicking on the retain style setting.
33. Draw out sphere shape on top of pot. Using your mover tool to
center it.
34. Go to Layers, Duplicate. Using your mover tool, move this ball to the
bottom of pot. In your layers Pallet, move this layer under your merged
layer.
35. Layers, Duplicate, Image, Mirror. Move this ball to the left side of
bottom of pot.
36. Layers, Duplicate. Move this ball in the center at bottom of pot,
Placing it down just a bit.
37. Apply EyeCandy Shadowlab to each ball, using the same settings we
have been using.
38. At this point you are done, merge all layers visible. If you want you
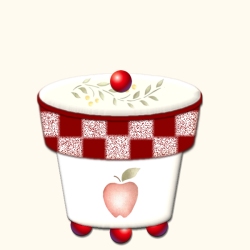
can add a background. Resize and sharpen as needed.
39. This is your final Image. Hope you enjoyed this tutorial.
If you have any questions concerning this tutorial
please let me know.